List Items in SharePoint Meeting Workspaces

Sunday, April 22, 2012

3

Lists in SharePoint Meeting Workspaces with multiple instances (a recurring meeting, or multiple single meetings) can be in one of two modes:

  • List items are shared across all meeting instances
  • List items are specific to a meeting instance

Most of the OOB lists in a Meeting Workspace are by default in the 2nd mode.  If you add a Task item to one meeting instance, it will not show up when you navigate to another instance.  This gives the user experience of each meeting instance having its own list, but there's really just one list that's "instance-aware".


Making a List Shared

To make a list shared from the UI, go to List Settings --> Advanced Settings, and select Yes for Share List Items Across All Meetings:


To do the same programmatically, set SPList.MultipleDataList to FALSE.

Retrieving Instance-specific List Items

To retrieve items from a specific meeting instance, set the SPQuery.MeetingInstanceId property when querying the list.  For recurring meetings, the InstanceID is an integer that represents the meeting date in yyyyMMdd format (ie. 20120422 for April 22nd, 2012).  In workspaces with multiple non-recurring meetings, the InstanceID is just an identifier like 1, 2, 3, etc..

The example below queries for all Tasks with the title "My Task" under the 20120422 meeting instance:

SPList taskList = SPContext.Current.Web.Lists["Tasks"];

SPQuery query = new SPQuery();

query.MeetingInstanceId = 20120422;
query.Query = "<Where><Eq><FieldRef Name=\"Title\" /><Value Type=\"Text\">My Task</Value></Eq></Where>";

SPListItemCollection results = taskList.GetItems(query);

To retrieve items across all instances from a non-shared list, set SPQuery.MeetingInstanceId to the SPMeeting.SpecialInstance.AllButSeries enumeration.  You have to cast the enum to an int.

Adding Instance-specific List Items

To add a list item to a specific meeting instance, simply set the item's InstanceID.  Property name is case sensitive, and value must be of type int, not string:

SPList taskList = SPContext.Current.Web.Lists["Tasks"];

SPListItem newItem = taskList.Items.Add();
newItem["Title"] = "My Task";
newItem["InstanceID"] = 20120422;

newItem.Update(); 

For more tips such as how to find current or future recurring meeting instance IDs, check out my Working with SharePoint Recurring Meeting Workspaces post.


Deploying Multi-select Managed Metadata Fields

Saturday, April 21, 2012

10

Taxonomy site columns can be provisioned just like other columns through a Feature. There are already excellent tutorials out there on how to deploy site columns via Feature--for instance, this post on Fabian William's blog.  However, there are some pitfalls to getting the Elements file right for Managed Metadata fields (MM for short hereafter).  This post covers:

  • How to provision a MM field
  • TargetTemplate property's function and it's effect on TaxonomyFieldControl
  • How to enable multi-select

Hidden Note Field 

Firstly, each MM field must be paired with a hidden Note field.  The MM field stores the value of the metadata term, while the associated Note field holds the term's taxonomy ID.  If you provision just the MM one, it'll show up on the site, but you'll probably run into this error once you try to put values in: Failed to get value of the “{0}” column from the “Managed Metadata” field type control. See details in log. Exception message: Invalid field name. {00000000-0000-0000-0000-000000000000}.

The example below deploys a new MM column called Keywords, and a Note column called KeywordsTaxHTField0.  The Note field can be named anything, but I use the TaxHTField0 suffix to be consistent with SharePoint's convention.

The MM field's TextField property references the Note field's ID. This is what links the two columns.

<Field ID="{AFFCC398-1B80-49B4-9367-5980C74AF556}"
            Type="Note"
            Name="KeywordsTaxHTField0"
            StaticName="KeywordsTaxHTField0"
            DisplayName="Keywords_0"
            ShowInViewForms="false"
            Hidden="true"
            CanToggleHidden="true"
            Group="Custom" />

<Field ID="{9D21CCB4-B815-483E-A1C1-9947A1514187}"
            Type="TaxonomyFieldType"
            Name="Keywords"
            StaticName="Keywords"
            DisplayName="Keywords"
            ShowField="Term1033"
            Required="false"
            Group="Custom">
   <Customization>
      <ArrayOfProperty>
         <Property>
            <Name>TextField</Name>
            <Value xmlns:q6="http://www.w3.org/2001/XMLSchema"
                         p4:type="q6:string"
                         xmlns:p4="http://www.w3.org/2001/XMLSchema-instance">
               AFFCC398-1B80-49B4-9367-5980C74AF556
            </Value>
          </Property>
      </ArrayOfProperty>
   </Customization>
</Field>


TargetTemplate and TaxonomyFieldControl Rendering

Sometimes, in my twisted dreams, SharePoint comes to me, a goddess with eyes afire, whose alien desires and inscrutable whims lay waste to entire farms.  She passes judgement atop a giant hourglass, a literal timer job run on the raging souls of a thousand broken developers.  A simpler metaphor might be a box of chocolates.  The point is, some crazy, existential sh*t happens on SharePoint.

Say you add a MM field to an Enterprise Wiki and put down a TaxonomyFieldControl on the page to display the new field, right under the OOB Wiki Categories control with this markup:

<Taxonomy:TaxonomyFieldControl
    FieldName="Wiki_x0020_Page_x0020_Categories"
    EmptyValueDescriptionForTargetTemplate="<%$Resources:cms,enterwiki_nocategories_assigned%>"
    DisableInputFieldLabel="true"
    runat="server" />

<Taxonomy:TaxonomyFieldControl
    FieldName="Keywords"
    EmptyValueDescriptionForTargetTemplate="No keywords tagged"
    DisableInputFieldLabel="true"
    runat="server" />

The declarations are identical except for the fieldname and message to display when the field is empty.  The two TaxonomyFieldControls render completely differently:


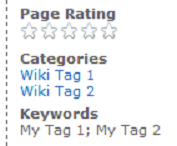
OOB wiki categories display line by line, each linked to a page listing all articles tagged with that category.  The second taxonomy control is a comma-separated text list.  It also refuses to display the EmptyValueDescription when no tags are selected.  Scritch... scritch...


Much blood, tears and other fluids were unwillingly shed--unspeakable rituals performed--in search of an answer.  It turns out, to get the TaxonomyFieldControl to render like Wiki Categories, the Managed Metadata field it points to must have it's TargetTemplate property set.  TargetTemplate specifies the URL for the term hyperlinks.  For instance, TargetTemplate for Wiki Categories is /_layouts/Categories.aspx, a page which lists all articles tagged with the category.  You can point to that, or make a better looking custom page.  To set TargetTemplate, include the following property in your MM field declaration:

<Property>
     <Name>TargetTemplate</Name>
     <Value xmlns:q6="http://www.w3.org/2001/XMLSchema"
                  p4:type="q6:string"
                  xmlns:p4="http://www.w3.org/2001/XMLSchema-instance">
          /_layouts/Categories.aspx
     </Value>
</Property>


Allow Multiple Values 

To make a multi-select MM field, declare the field Type as TaxonomyFieldTypeMulti instead of TaxonomyFieldType, and set Mult to true.  You must also explicitly set Sortable to false; otherwise multi-select will not be enabled despite the Type and Mult properties!

The full example below provisions a multi-select MM field with TargetTemplate, along with the associated hidden Note field:

<Field ID="{AFFCC398-1B80-49B4-9367-5980C74AF556}"
           Type="Note"
           Name="KeywordsTaxHTField0"
           StaticName="KeywordsTaxHTField0"
           DisplayName="Keywords_0"
           ShowInViewForms="false"
           Hidden="true"
           CanToggleHidden="true"
           Group="Custom" />

<Field ID="{9D21CCB4-B815-483E-A1C1-9947A1514187}"
           Type="TaxonomyFieldTypeMulti"
           Name="Keywords"
           StaticName="Keywords"
           DisplayName="Keywords"
           ShowField="Term1033"
           Required="FALSE"
           Mult="TRUE"
           Sortable="FALSE"
           Group="Custom">
     <Customization>
          <ArrayOfProperty>
               <Property>
                   <Name>TextField</Name>
                    <Value xmlns:q6="http://www.w3.org/2001/XMLSchema"
                                 p4:type="q6:string"
                                 xmlns:p4="http://www.w3.org/2001/XMLSchema-instance">
                         AFFCC398-1B80-49B4-9367-5980C74AF556
                    </Value>
               </Property>
              <Property>
                  <Name>TargetTemplate</Name>
                  <Value xmlns:q6="http://www.w3.org/2001/XMLSchema"
                               p4:type="q6:string"
                               xmlns:p4="http://www.w3.org/2001/XMLSchema-instance">
                      /_layouts/Categories.aspx
                  </Value>
              </Property>
          </ArrayOfProperty>
     </Customization>
</Field>


Working with SharePoint Recurring Meeting Workspaces

Tuesday, April 17, 2012

1

There seems to be sadly scant documentation out there on working with Meeting Workspaces through the SharePoint API.  Especially when it comes to recurring meetings, some (seemingly) basic pieces of meeting information can be very tricky to retrieve.  Here're a few that I've dealt with on a recent project:

  • What meeting instance is the user currently browsing?
  • Is the current workspace for a recurring meeting?
  • Given a specific date, when is the next recurrence?
  • What are the recurrences for the next X months?

For tips on working with list items in recurring Meeting Workspaces, check out my List Items in SharePoint Recurring Meeting Workspaces post.


What meeting instance is the user currently browsing?

You can get this by creating a SPMeeting object from SPContext.Current:

if (SPContext.Current != null)
    && SPContext.Current.Web != null
    && SPMeeting.IsMeetingWorkspaceWeb(SPContext.Current.Web))
{
  SPMeeting meeting = SPMeeting.GetMeetingInformation(SPContext.Current.Web);
  return meeting.InstanceId;
}


Is the current meeting workspace for a recurring meeting?

You can get this by creating a SPMeeting object from SPContext.Current and seeing if MeetingCount is -1:

if (SPContext.Current != null
    && SPContext.Current.Web != null
    && SPMeeting.IsMeetingWorkspaceWeb(SPContext.Current.Web))
{
  SPMeeting meeting = SPMeeting.GetMeetingInformation(SPContext.Current.Web);
  bool isRecurring = (meeting.MeetingCount == -1);
 
  return isRecurring;
}

What is the next meeting recurrence?  Or the recurrences for the next 6 months?

This one is quite tricky.  My initial thought was to query the hidden Meeting Series list, which keeps track of all the meeting instances in a workspace.

Unfortunately, an instance is only added to the Meeting Series list when a user browses to that instance for the first time.  If you create a new meeting workspace with 10 recurrences, Meeting Series will initially contain a single row, representing the entire meeting series.  When someone browses to say, the 3rd recurrence, that will then be added to Meeting Series.  And so forth.  This actually makes sense, because recurring meetings can be indefinite and the list can't be populated with infinite recurrences!

Poking around the OOB webparts and dlls, I found that SharePoint itself uses this obscure piece of CAML to retrieve future instances, ordered by start date:

<Where>
     <DateRangesOverlap>
         <FieldRef Name="EventDate" />
         <FieldRef Name="EndDate" />
         <FieldRef Name="RecurrenceID" />
         <Value Type="DateTime">
             <Month />
         </Value>
     </DateRangesOverlap>
</Where>
<OrderBy>
     <FieldRef Name="EventDate" />
</OrderBy>

This, combined with a couple key SPQuery properties will return all meeting instances within a specified month, regardless of whether they've been visited or not.  More often than not this query will return more items than the ItemCount for Meeting Series!

SPList list = SPContext.Current.Web.Lists["Meeting Series"];
 
SPQuery query = new SPQuery();
query.CalendarDate = new DateTime(2014, 04, 16);
query.Query = "";   // CAML query above
query.ExpandRecurrence = true;
query.MeetingInstanceId = (int)SPMeeting.SpecialInstance.AllButSeries;   
query.RowLimit = 50;
 
SPListItemCollection results = list.GetItems(query); 

The code above returns all meeting instances in the month specified by CalendarDate (April 2014).  The particular day doesn't matter.  The results may include the last week of March and first week of May.  ExpandRecurrence must be set to TRUE to include unvisited meeting instances.

Aside from <Month /> under <DateRangesOverlap>, the CAML query can also specify: <Now />, <Today />, <Week />, and <Year />.  Unfortunately, <Year /> seems to return completely non-sensical results.  I've tried it on multiple workspaces, and it never returns instances within the specified year like you'd expect.

So.  Back to the original questions.  Since <Year /> doesn't work, to find all instances within the next 6 months, I query one month at a time, incrementing Calendar date with each iteration.  Similarly, to find the next recurrence, I search forward one month at a time until an instance is found, like so:

public static int GetNextMeetingInstanceId(int currentInstanceId)
{
   int nextInstanceId = currentInstanceId;
 
   SPList list = SPContext.Current.Web.Lists["Meeting Series"];
 
   // Convert instanceID to DateTime
   DateTime searchDate = DateTime.ParseExact(currentInstanceId.ToString(), 
                           "yyyyMMdd", CultureInfo.InvariantCulture);
 
   // Search up to the next 12 months for the next instance
   for (int i = 0; i <= 12; i++)
   {
      DateTime monthToSearch= searchDate.AddMonths(i);
 
      // Retrieve instances for the month we're currently searching through, 
      // ordered by start date
 
      SPQuery query = new SPQuery();
      query.CalendarDate = monthToSearch;
      query.Query = ""; // CAML query above
      query.ExpandRecurrence = true;
      query.MeetingInstanceId = (int)SPMeeting.SpecialInstance.AllButSeries; 
      query.RowLimit = 50;
 
      SPListItemCollection results = list.GetItems(query);
 
      foreach (SPListItem instance in results)
      {
         int instanceId = (int)instance["InstanceID"];
         if (instanceId > currentInstanceId)
         {
            nextInstanceId = instanceId;
            return nextInstanceId;
         }
      }
   }
 
   return nextInstanceId;
}


And Death Shall Have No Dominion

Monday, February 20, 2012

1

I was nodding off on a trans-Atlantic flight, grinding through endless 90's action flicks--only the occasional exploding car keeping me from becoming a drooling mess--when I came across this little gem of a film called Solaris.  The story moved pretty slowly at times, but overall is very thought-provoking.  Definitely one of the better sci-fi films I've seen--no aliens, no lasers, no bs.

The Dylan Thomas poem in Solaris really blew me away.  I'm not sure whether it celebrates the immortality of the human spirit, or implies the opposite.  Either way, this poem gives me some serious chills.  And we're not talking nerd chills here.

The "death shall have no dominion" refrain sounds like one praying for it to be true, all the while knowing it's not.  Do the religious-sounding contradictions show the spirit transcending maddness, suffering, and even death? Or highlight the futility of an existence where happiness is never without suffering?


And Death Shall Have No Dominion

And death shall have no dominion.
Dead mean naked they shall be one
With the man in the wind and the west moon;
When their bones are picked clean and the clean bones gone,
They shall have stars at elbow and foot;
Though they go mad they shall be sane,
Though they sink through the sea they shall rise again;
Though lovers be lost love shall not;
And death shall have no dominion.

And death shall have no dominion.
Under the windings of the sea
They lying long shall not die windily;
Twisting on racks when sinews give way,
Strapped to a wheel, yet they shall not break;
Faith in their hands shall snap in two,
And the unicorn evils run them through;
Split all ends up they shan't crack;
And death shall have no dominion.

And death shall have no dominion.
No more may gulls cry at their ears
Or waves break loud on the seashores;
Where blew a flower may a flower no more
Lift its head to the blows of the rain;
Though they be mad and dead as nails,
Heads of the characters hammer through daisies;
Break in the sun till the sun breaks down,
And death shall have no dominion


SharePoint 2007 Installation Service Accounts

Saturday, September 24, 2011

0

Figuring out what service accounts are needed to setup SharePoint can be pretty confusing.  There's a whole novella on MSDN with excruciating detail on all the different combinations of AD and SQL accounts you could use.  I had to scrape pieces of my brain off the walls after reading through that monstrosity.

But after doing a few buildouts, I've found that a basic setup is actually very simple.  And unless you have a specific reason to do otherwise (like having to satisfy a security requirement), sticking with the basic setup is the best way to stay sane.

There's a ton of information in the MSDN article about what permissions each account needs.  But, you really only have to worry about permissions for ONE account: the install account. The SharePoint setup and configuration wizards will automatically assign appropriate permissions for the rest of the service accounts!

I recommend creating a separate install account just for doing the SharePoint setup.  The install account must be a local Administrator on each SharePoint server, as well as the SQL server.  It should have sysadmin and dbcreator roles in SQL.  Run the SharePoint setup and config wizards under that account account.  In fact, it's a good idea to simply log in as the install account to do all your setup.

(On a side note, I've seen a lot of cases where people resolve permission issues by making the Farm account or other service accounts local Administrators. Only the install account should be a local Admin, and only for doing the initial setup! If you have to make other service accounts local Admin, there's probably something mis-configured.)

Once setup is complete, all administrative privileges for the install account can be revoked.

All in all, I typically use 1 install account, and 5 service accounts:

Account Description
Install Account This is the account I login to each server as to do the buildout. Before doing the setup, you have to manually make this account a local Administrator on each server. It also needs to have sysadmin and dbcreator roles in SQL.

After the initial setup of SharePoint, this account is no longer needed.
Farm Account Runs Central Admin app pool and SP Timer service.
SSP Account Runs SSP Admin app pool, as well as individual SSP app pools
Search Account Runs the Search services (Windows SharePoint Services Search service, and Office SharePoint Server Search service)
Crawl Account Default account used to crawl content
Web Application Account Runs web application app pool. I usually create a separate app pool account for each web application


Trick Restroom

Wednesday, September 14, 2011

0

We just moved to a new office this week with walls whiter than a toothpaste ad and sqeaky clean restrooms. An interesting observation about the restroom dawned on me today: there are no urinals.  All stalls.  I went back to the door, looked at the loo next door and saw this:


Hmm.  Went back, did my business, went out--took another look around.  I'd been going the left one all week long...


Blogger Post Summaries & Thumbnails, Part II

Monday, September 05, 2011

6

This is Part II on how to make Blogger display post summaries with thumbnail previews.  Part I goes over exactly what we're trying to accomplish and how the results will look.

The process described here should work on all the out-of-box Blogger templates.  Complications may arise if you're using a heavily customized template... Be sure to save a copy of your template before making any changes!


Edit Template

First, we have to open the blog template for editing.  On your blog's Administration page, go to Template, then click on Edit HTML:


Check Expand Widget TemplatesBefore continuing, save a copy of the full template just in case.


Insert Summary Generation Script

Next, we insert a piece of javascript to generate the summaries.  Search for the following tag in the template: <b:includable id="main" var="top">


Copy and paste the code in this file into the space circled in red above:


Update Post Body Template

Finally, we update the template that renders a post to invoke the summary creation script if the current page is the Home page.  If we're on an individual post page or a static page, then display the full post body as normal.

To do so, search for the following tag in the template: <b:includable id="post" var="post">.  Then, search for <data:post.body/> beneath that.  Note that there may be more than one <data:post.body/> in the template, and we specifically want the one under that first tag:


Replace the tag with the contents of this file:


That's it!  Save the template and you should start seeing post summaries on your blog. For reference, here's the entire default Simple template with the added code.


Working with Thumbnails

By default, the first image in post will be used as the thumbnail.  You can override this behavior on specific posts by setting the class attribute on its images (from the post editor's HTML view).  Note that the attributes are case-sensitive.

  • - To use an image other than the first as the thumbnail, set that image's class to preview
  • - To specifically prevent an image from being used as the thumbnail, set its class to noPreview
  • - To use a completely different thumbnail, add the thumbnail image to the post, and set its class to hiddenPreview.  This image will not be visible on the full post, but will be used as the thumbnail for the summary.  I'd recommend putting this at the very end of the post.

For instance, the update below would cause the second image to be used as the thumbnail:


The end!


Blogger Post Summaries & Thumbnails, Part I

Monday, September 05, 2011

0

So I stumbled on some Blogger templates and decided to give my poor, tired blog a makeover.  I fell hard for the pretty ones with the flyout menus, post summaries, thumbnails and all.  Unfortunately, like so many of my flirtations with pretty things, it ended only in despair and disappointment.  My blog ended up looking nothing like what the previews promised, mainly because:

  • - The thumbnail images were stretched to fit, instead of cropped.  They looked absolutely atrocious unless the first picture in all my posts happened to be square.
  • - The preview text was one big blob of text since HTML elements like line breaks, coloring, and bullet points were being stripped.
  • - I couldn't use an image other than the first in a post as the thumbnail preview


That can't fly!  I did some digging and cooked up a short script to generate summaries.  It should work with most Blogger templates, and for sure the out-of-box ones.  Here's how it looks applied to the default "Simple" template.  I can create posts with any formatting and images of any size.


The Home page shows the first few lines of each post, with a "Read More" link to the full post.  Note that formatting like linebreaks and bullets are preserved.  The 200 x 200 thumbnails are then cropped from the top left corner of the first image (unless otherwise specified) in the post.


Read Part II for how to implement this.