Simple Custom DropDown Search Refiner

Tuesday, April 29, 2014

0

Once an arcane Art whose brooding mysteries eluded the most learned and powerful gurus, custom SharePoint search is vastly more powerful and simple in SP 2013. Through display templates, we can render arbitrary HTML / JS for both search refiners and results. The possibilities are endless. Pie-chart refiners? Hands-free refining via neural matrix uplink? Refinement with actual pies?  Someone’s probably already blogged it.

Still, creating my first custom refiner was a daunting task—especially with the profusion of sophisticated examples.  Here I’ll go over how to make a very simple drop-down refiner that acts more like a plain ol' filter.

The goal is to let users filter on Approval Status (the ows__ModerationStatus field).
There are a bunch of statuses, but most users only care about “published” vs “non-published”. So let’s build a refiner with just  those options.

Active will filter for Approved status, and Inactive will be everything else (Draft, Pending, Scheduled, etc).  Note that the value in Moderation Status is actually an integer which corresponds to these statuses.

Assumptions

Though ows__ModerationStatus field is an OOB field, it is not by default a search Managed Property. I’m assuming in this example that it’s already been mapped to a Managed Property called ModerationStatus.

I'm also assuming Search is configured and working properly, and you have a page with Search Results and Search Refinement webparts.

Custom Display Template

Let's start simple by building a refiner with a static dropdown box.  The OOB refiner display templates live in the Master Page Gallery, under /_catalogs/masterpage/Display Templates/Filters


Note that there is a HTML and JS file for each template.  The JS is a SharePoint generated file.  We will only ever work with the HTML.  Download a copy of Filter_Default.html.

Crack that open in a text editor and remove everything between the body tags.  You will end up with just this:

<html xmlns:mso="urn:schemas-microsoft-com:office:office"
      xmlns:msdt="uuid:C2F41010-65B3-11d1-A29F-00AA00C14882">
<head>
<title>Refinement Item</title>

<!--[if gte mso 9]><xml>
<mso:CustomDocumentProperties>
<mso:CompatibleManagedProperties msdt:dt="string"></mso:CompatibleManagedProperties>
<mso:TemplateHidden msdt:dt="string">0</mso:TemplateHidden>
<mso:CompatibleSearchDataTypes msdt:dt="string"></mso:CompatibleSearchDataTypes>
<mso:MasterPageDescription msdt:dt="string"></mso:MasterPageDescription>
<mso:ContentTypeId msdt:dt="string">0x0101002039C03B61C64EC4A04F5361F385106604</mso:ContentTypeId>
<mso:TargetControlType msdt:dt="string">;#Refinement;#</mso:TargetControlType>
<mso:HtmlDesignAssociated msdt:dt="string">1</mso:HtmlDesignAssociated>
</mso:CustomDocumentProperties></xml><![endif]-->
</head>
<body>

</body>
</html>

Update the title.  Inside the body, we'll add a couple DIVs and a static drop down box:

<html xmlns:mso="urn:schemas-microsoft-com:office:office"
      xmlns:msdt="uuid:C2F41010-65B3-11d1-A29F-00AA00C14882">
<head>
<title>Moderation Status Refinement</title>

<!--[if gte mso 9]><xml>
<mso:CustomDocumentProperties>
<mso:CompatibleManagedProperties msdt:dt="string"></mso:CompatibleManagedProperties>
<mso:TemplateHidden msdt:dt="string">0</mso:TemplateHidden>
<mso:CompatibleSearchDataTypes msdt:dt="string"></mso:CompatibleSearchDataTypes>
<mso:MasterPageDescription msdt:dt="string"></mso:MasterPageDescription>
<mso:ContentTypeId msdt:dt="string">0x0101002039C03B61C64EC4A04F5361F385106604</mso:ContentTypeId>
<mso:TargetControlType msdt:dt="string">;#Refinement;#</mso:TargetControlType>
<mso:HtmlDesignAssociated msdt:dt="string">1</mso:HtmlDesignAssociated>
</mso:CustomDocumentProperties></xml><![endif]-->
</head>
<body>
   <div id="ModerationStatusRefinement">
      <div id="Container">
         <select id="statusDdl">
            <option value="0">ALL</option>
            <option value="1">Active</option>
            <option value="2">Inactive</option>
         </select>

      </div>
   </div>

</body>
</html>

Test Drive

Now, let's see it in action!  Save the file as Filter_ModerationStatus.html, and upload it to the Master Page gallery.

Edit your Refinement webpart, and hit Choose Refiners.  Add the ModerationStatus managed property as a refiner, and change its Display Template.  Note that this was the title we set in the HTML.
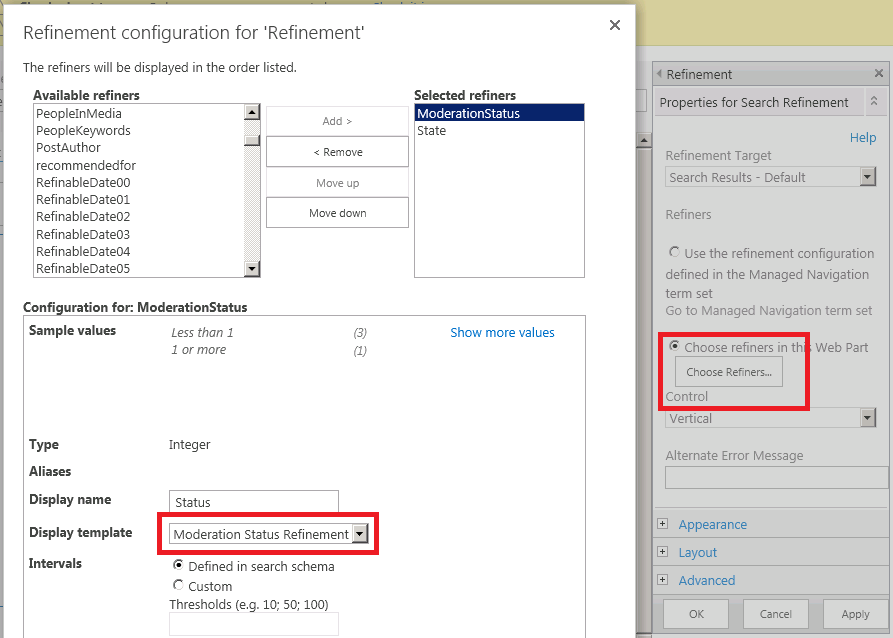

Hit OK and save the page.  If you see a drop down in the refiners panel, we're in business.  Sort of.  Of course, it doesn't do anything yet...

Adding Refinement

To make the refiner, you know... refine stuff, we have to update the active refiners when the dropdown value changes.  This is done through javascript by invoking methods on the refiner control.

First, wire up the dropdown box's onchange event.  We will create an applyRefiner(val, refinerCtrl) method to apply the selected refiner.  The javascript code for this method needs to go into an external JS file.

Note: this file can not have the same name as the display template.  That is reserved for the SharePoint generated JS file.  I named the example Filter_ModerationStatus_functions.js.

Add a script block beneath the body to reference this external file.

<html xmlns:mso="urn:schemas-microsoft-com:office:office"
      xmlns:msdt="uuid:C2F41010-65B3-11d1-A29F-00AA00C14882">
<head>
<title>Moderation Status Refinement</title>

<!--[if gte mso 9]><xml>
<mso:CustomDocumentProperties>
<mso:CompatibleManagedProperties msdt:dt="string"></mso:CompatibleManagedProperties>
<mso:TemplateHidden msdt:dt="string">0</mso:TemplateHidden>
<mso:CompatibleSearchDataTypes msdt:dt="string"></mso:CompatibleSearchDataTypes>
<mso:MasterPageDescription msdt:dt="string"></mso:MasterPageDescription>
<mso:ContentTypeId msdt:dt="string">0x0101002039C03B61C64EC4A04F5361F385106604</mso:ContentTypeId>
<mso:TargetControlType msdt:dt="string">;#Refinement;#</mso:TargetControlType>
<mso:HtmlDesignAssociated msdt:dt="string">1</mso:HtmlDesignAssociated>
</mso:CustomDocumentProperties></xml><![endif]-->
</head>
<body>
   <script>
      $includeScript(this.url, "~sitecollection/_catalogs/masterpage/display templates/filters/filter_moderationstatus_functions.js");
   </script>

   <div id="ModerationStatusRefinement">
     <div id="Container">
       <select id="statusDdl"
             onchange="javascript:applyRefiner(this.value, $getClientControl(this));">
         <option value="0">ALL</option>
         <option value="1">Active</option>
         <option value="2">Inactive</option>
       </select>
     </div>
   </div> 
</body>
</html>

Create Filter_ModerationStatus_functions.js, and add the code below.  Recall that val is the option value that's just been selected.

First, we clear any active ModerationStatus refiners by setting it to NULL.  Then, for Active, add a refinement for ModerationStatus = 0, which stands for Approved.  Inactive actually corresponds to a set of ModerationStatuses, so we use addRefinementFiltersWithOp with an OR operation to tell SharePoint to match on any of the statuses in the array.

function applyRefiner(val, refinementCtrl) {
   // Clear refiners
   refinementCtrl.updateRefiners( { 'ModerationStatus' : null } );

   if (val == 1) // Active --> Approved
      refinementCtrl.addRefinementFilter('ModerationStatus', '0');
   else if (val == 2) // Inactive --> Rejected, Pending, Draft, Scheduled
      refinementCtrl.addRefinementFiltersWithOp(
          { 'ModerationStatus' : ['1','2','3','4'] },
          'or'
      );
}

There's scant documentation on MSDN (and by scant I mean none) for the refiner control, but check out Elio Struyf's blog post for other refinement methods and more examples.

Upload both the HTML and JS files, and reload the search result page.  Now, when you change the dropdown, the search results should be getting refined!

Finishing Touches

You probably noticed the Status selection doesn't stay selected and gets reset (though the search results are being refined).  This is because we didn't take into account which option is already selected when rendering the dropdown.

To fix this, we have to add some javascript to the display template.  This is different from the javascript in the external file.  Javascript inside the display template controls what gets rendered.  The script itself is not emitted on to the page.  Therefore, javascript that's invoked by the controls on the page must live in an external file.

Within the template, all javascript statements must be enclosed in special tags: <!--#_   _#-->.  Javascript variables can also be emitted on to the page when wrapped in these tags: _#=   =#_.

We'll make a simple method to render the dropdown option based on it's selected state:

function addRefiner(val, text, selected) {
   if (selected) {
      <option selected="selected" value="val">text</option>
   } else {
      <option value="val">text</option>
   }
}

The javascript lines and variables must be wrapped before being added to the template:

<!--#_
   function addRefiner(val, text, selected) {
      if (selected) {
_#-->
         <option selected="selected" value="_#= val =#_">_#= text =#_</option>
<!--#_
      } else {
_#-->
         <option value="_#= val =#_">_#= text =#_</option>
<!--#_
      }
   }
_#-->

Finally, we replace the hard-coded options in the dropdown with calls to addRefiner.  For each option, we ask the refinement control if the corresponding filters are active by calling hasAllRefinementFilters.

For completion, we can also add a title at the top.

<html xmlns:mso="urn:schemas-microsoft-com:office:office"
      xmlns:msdt="uuid:C2F41010-65B3-11d1-A29F-00AA00C14882">
<head>
<title>Moderation Status Refinement</title>

<!--[if gte mso 9]><xml>
<mso:CustomDocumentProperties>
<mso:CompatibleManagedProperties msdt:dt="string"></mso:CompatibleManagedProperties>
<mso:TemplateHidden msdt:dt="string">0</mso:TemplateHidden>
<mso:CompatibleSearchDataTypes msdt:dt="string"></mso:CompatibleSearchDataTypes>
<mso:MasterPageDescription msdt:dt="string"></mso:MasterPageDescription>
<mso:ContentTypeId msdt:dt="string">0x0101002039C03B61C64EC4A04F5361F385106604</mso:ContentTypeId>
<mso:TargetControlType msdt:dt="string">;#Refinement;#</mso:TargetControlType>
<mso:HtmlDesignAssociated msdt:dt="string">1</mso:HtmlDesignAssociated>
</mso:CustomDocumentProperties></xml><![endif]-->
</head>
<body>

   <script>
      $includeScript(this.url, "~sitecollection/_catalogs/masterpage/display templates/filters/filter_moderationstatus_functions.js");
   </script>

   <div id="ModerationStatusRefinement">
       <div id="Container">
         <div style="font-size:13pt; margin-bottom: 10px">
            _#= Srch.Refinement.getRefinementTitle(ctx.RefinementControl) =#_
         </div>

         <select id="statusDdl"
               onchange="javascript:applyRefiner(this.value, $getClientControl(this));">
<!--#_
addRefiner(0, 'All', ctx.ClientControl.hasAllRefinementFilters('ModerationStatus', ['']));
addRefiner(1, 'Active', ctx.ClientControl.hasAllRefinementFilters('ModerationStatus', ['0']));
addRefiner(2, 'Inactive', ctx.ClientControl.hasAllRefinementFilters('ModerationStatus', ['1', '2','3','4']));
_#-->

          </select>
       </div>
<!--#_
   function addRefiner(val, text, selected) {
      if (selected) {
_#-->
         <option selected="selected" value="_#= val =#_">_#= text =#_</option>
<!--#_ 
      } else {
_#--> 
         <option value="_#= val =#_">_#= text =#_</option>
<!--#_
      }
   }
_#-->

   </div> 
</body>
</html>


Setting Managed Metadata Column Default Value

Monday, April 28, 2014

3

In this post I'll go over programmatically setting the default value on a taxonomy column.  This turns out to be a bit trickier than one would expect.

TaxonomyField.DefaultValue expects a string in the format <WssId>;#<TermLabel>|<TermGuid>. TermLabel and TermGuild are easy to find, but what about WssId?

If you already know about the TaxonomyHiddenList and WssId, go ahead and skip to the next paragraph. Every site that works with Managed Metadata has a hidden list called, aptly, TaxonomyHiddenList. This serves as a local cache, and all term references on the site actually point to items in this hidden list. WssID refers to a term’s ID in this list. It is initially empty, and terms are added the first time they’re actually used on the site.

In most situations, we do not have to worry about the WssID. When adding a list item with a taxonomy field, setting WssID to -1 tells SharePoint to resolve the WssID if the term exists in TaxonomyHiddenList, or otherwise add it.

Unfortunately, this does not work when setting a field’s default value. The -1 WssId will simply be saved as the default value. Note that setting DefaultValue with an invalid WssID will not cause an exception, and the default value still shows up in the column settings UI. However, when you actually create a new list item, the default value will not be set.

We can try to retrieve WssId from TaxonomyHiddenList, but if the term hasn’t been used on the site before, there will be no WssID. SharePoint does not expose any method to explicitly add a term to the hidden list.

The solution is to create a dummy list item, and call SetFieldValue with the term. You do NOT have to actually save the dummy item by calling Update() on it. Simply calling SetFieldValue triggers a SharePoint internal “TouchAllTaxonomyColumns” method on the field, which populates the hidden list if needed.

Finally, GetValidatedString returns the complete string that DefaultValue expects.

$web = Get-SPWeb -Identity http://sharepointificate.com

# Get Taxonomy column

$list = $web.Lists["Posts"]
$taxField = $list.Fields["Label"] -as 
              [Microsoft.SharePoint.Taxonomy.TaxonomyField];

# Get term

$termStoreId = taxField.SspId;
$termSession = Get-SPTaxonomySession -Site $list.ParentWeb.Site;
$termStore =  $termSession.TermStores[$termStoreId];
$termSet = $termStore.GetTermSet( $taxField.TermSetId );
$terms = $termSet.GetTerms( "SharePoint", $false );
$term = $terms[0];

# Use the term in a dummy item to ensure that is added to the site's
# HiddenTaxonomyList and has a WssId. Do NOT call Update() on
# the item-- we don't actually want to add it.  Simply calling SetFieldValue
# will force SP to initialize the hidden list entry.

$newItem = $list.Items.Add();
$taxField.SetFieldValue( $newItem, $term );

# Retrieve term string from dummy item, 
# in form of <wssid>;#<termlabel>|<termguid>

$value = $taxField.GetValidatedString( $newItem[$taxField.Id] );

# Set default value and save

$taxField.DefaultValue = $value;
$taxField.Update(); 


Enum to Drop Down List Html Helper Extension for ASP MVC 3

Monday, December 24, 2012

0

In this post I'll go over how to build a MVC3 HtmlHelper extension to map Enum model properties to a dropdown listbox.

The extension will follow the same pattern as out-of-box generic helper functions like @Html.LabelFor<> and @Html.TextBoxFor<>.

Say we have a simple Employee model with Name (string) and Department (nullable enum) fields, and need to make a form for creating new employees:

public enum Department
{
Development,
Sales,
HR
}

public class Employee
{
public string Name { get; set; }
public Department? Dept { get; set; }
}

We can create a label and textbox for the Name with this View cshtml:

@model Employee

<h2>New Employee</h2>

@Html.LabelFor(model => model.Name)
<br />
@Html.TextBoxFor(model => model.Name)

Which renders into:


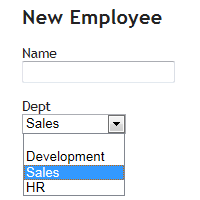
There is, however, no way to handle the Department field.  Our goal is to build a custom HtmlHelper to map enum fields like Department to a drop down list.  If the field is Nullable, the dropdown needs to include an empty option.  The end product will work like this:

@Html.LabelFor(model => model.Dept)
<br />
@Html.DropDownEnumListFor(model => model.Dept, Department.Sales)

and render into:

Create Extension Method

Luckily, we don't have to start from scratch.  MVC3 already has a DropDownListFor<> helper, which takes as input a SelectList object containing objects to populate the dropdown.

The bulk of our work will be in building an appropriate SelectList from a given enum.

First, let's create the DropDownEnumListFor<> extension method.  Add a static class to your MVC project.  It doesn't matter where you put it or what it's called.  Remember to import System.Web.Mvc, System.Web.Mvc.Html, and System.Linq.Expressions namespaces.

public static class Extensions
{
public static MvcHtmlString DropDownEnumListFor<TModel, TValue>(
this HtmlHelper<TModel> helper,
Expression<Func<TModel, TValue>> expr,
TValue selectedItem)
{
return helper.DropDownListFor(expr, ToSelectList<TValue>(selectedItem));
}

public static SelectList ToSelectList<T>(T selectedValue)
{
throw new NotImplementedException();
}
}

The expr parameter is a lamba function that takes as input the model and returns your property value.  On the View page, this is the model => model.Dept part.  selectedItem is the enum value that should be selected initially.

At this point, the new method should be available in Intellisense.  Remember to add a using statement in the View cshtml for the namespace your extension lives under.


Now we have to implement ToSelectList<T>, which converts any given Enum type T to a SelectList.

Handle Nullable Enums

Let's start by creating two helper methods to deal with Nullable enum types.

public static bool IsTypeNullable(Type type)
{
return (type.IsGenericType
&& type.GetGenericTypeDefinition() == typeof(Nullable<>));
}

public static Type GetBaseType(Type type)
{
return IsTypeNullable(type) ? type.GetGenericArguments()[0] : type;
}

IsTypeNullable simply checks if the specified type is Nullable.  GetBaseType converts a Nullable type to it's non-nullable type (ie decimal? to decimal).

Implement ToSelectList

Finally, implement ToSelectList<T>:

  1. If T is Nullable, retrieve the Enum type with GetBaseType
  2. If T is Nullable, add an empty option
  3. Get list of enum values using Enum.GetValues
  4. Build an ArrayList pairing each enum value with its display name
  5. Create a SelectList from the ArrayList

Code:

public static SelectList ToSelectList<T>(T selectedValue)
{
bool isNullable = IsTypeNullable( typeof(T) );
Type enumType = GetBaseType( typeof(T) );

if (enumType.IsEnum)
{
ArrayList items = new ArrayList();

// Add empty option
if (isNullable)
{
items.Add( new { Name = "", Value = default(T) } );
}

// Add enum values
var enumValues= Enum.GetValues(enumType);

foreach (T value in enumValues)
{
string displayName = Enum.GetName(enumType, value);
items.Add( new { Name = displayName, Value = value } );
}

return new SelectList(items, "Value", "Name", selectedValue);
}

return null;
}

Done!


2 Miles

Thursday, December 13, 2012

0

Goal: be able to run 2 miles in 15 minutes

I've come to the terrible realization that I can no longer claim in-shapness without deep, crushing shame, and a long string of qualifiers.  Well... I could run 2 miles if I really wanted to... on a good day... when I'm warmed up and the beam of a full moon crosses the shadow ofWhat, now? Right now?  Yeah... today's not really a good day...

I've fallen to the lot of the fitness have-nots.  This actually happened long ago, but I consoled myself that there were probably folks worse off.  I was solidly upper-lower class.  The fact of the matter is, I can't run 2 miles if Natalie Portman in her glorious Amidala regalia was standing at the end.  Well, I'd die trying.

Hence, this 2 mile goal.  I shall spend half an hour before work every day at the gym, another gerbil trying to outrun that cruel treadmill.  There's a simple but effective strategy from the project management playbook: formalize a goal, break it into discrete, quantifiable chunks, and consistently measure progress, and you've gone a long way toward actually achieving that goal.  I will, therefore, record here my progress every couple days.  Mile by terrible mile.


Nov 2821:00
Aaaaaaaaaaaaaaa..........

Dec 03 — 20:30
Shins really hurting at the end... could barely walk rest of day

Dec 05 — 20:00
Made it on 6 mph the whole way

Dec 06 — 19:40
Sped up to 8 mph last .15 mile.  I think I'm starting to settle into the routine.  Muscles no longer hurt afterward.

Dec 07
Utter failure. Tried to go up to 6.5 mph.  Had to stop after 1.5 miles.  Made up a mile at 7 mph.

Dec 12 — 18:30
6.5 mph the whole way.  Gettin it done.  Muscles weren't that strained, but breathing was very difficult last half mile.

Dec 13 — 18:00
Went up to 7.7 mph the last quarter mile.  It's getting harder and harder to speed up.  Cardio, not muscle fatigue, is the limiting factor.  Couldn't wake up today and had to run after work.

Gym tip: There's much debate on whether morning or afternoon workouts are better.  A lot of folks don't take environmental factors into account.  For instance, if you must use the gym showers, early morning wins hands down.  Afternoons mean sharing stalls with at least 3 other large hairless apes who, ironically, have far too much hair.  You don't want that.  Workout 6:30 AM, and make other people deal with your pilary leavings.

Dec 14 — 17:40
Did last half mile on 7.8 mph.  HALF WAY THERE!!  The easy half.  But whatever, this is still cause for rejoice.

Dec 18 — 17:15
Squeezed out 6.8, with last half mile on 7.5 mph.  Unfortunately, the gym will be closed for a week over the holidays :(

Dec 26 —
I AM DISAPPOINTS.  First day back at it after the holidays.  Could not finish last quarter mile.

Dec 27 — 17:00
6.8 mph, last half mile on 8.  Milestone breached.  With blood and iron.

Jan 25 — 16:40
First day back on the treadmill today!  I'd stopped running for about a month due to gym closures and illness.  Made half a mile on 8mph and the rest on 7, which is better than before the break.  I was quite impressed with myself.  Then I read that the current marathon record is about 12 mph.  For TWENTY SIX miles.  I think I prefer ignorance.

Feb 7 — 16:30
I have a sneaking suspicion my 16:40 time on the 25th was aided by a broken treadmill.  It was WAY too easy, especially after weeks away from the gym. In any case, 2 weeks later I've finally huffed, puffed, and cursed my way down to 16:30.  Patting myself on the back as I type this.

Mar 3— 16:15
I finally squeaked out 16:15 today after being stuck at 16:30 for quite a while.  I wonder whether it's my stamina or pain tolerance that's improved.


Zip File of Longing

Wednesday, December 12, 2012

0

There are a couple poems that I've read many times over, and still continue to read.  Though I know the words by heart, once in a while I have the urge to see them inked on a page.  Or at least, reflected off a screen.  Poems are captured emotions, and actually following their shape, feeling the stresses and pauses in their rhythm, releases their original form.

The distilled longing and sense of vulnerability she's zipped into a mere 3 dozen words never fails to move me.


Elysium is as far as to

Elysium is as far as to
The very nearest Room
If in that Room a Friend await
Felicity or Doom —

What fortitude the Soul contains
That it can so endure
The accent of a coming Foot —
The opening of a Door —


I've seen a couple interpretations of who or what exactly is in the other room.  I read this as a love poem.

In Greek mythology, Elysium is a realm of pleasure where heroes go in the afterlife.  So, heaven can be in the nearest room, if in that room awaits the one of your desires (Friend).  Who's there could bring wonderful bliss (Felicity) or utter despair (Doom).

For, when someone you long for is near, even their lightest step—the "accent of a coming Foot", and the gentlest of entrances—the "opening of a Door", fills you with anticipation and dread so heavy the Soul can hardly endure.  These lines capture so sharply those walking-on-eggshells feelings when you desire someone, who with a careless word would lift you to the clouds, or crush you into a spineless mess beneath their feet.


Filtering ListViews with URL Query String

Saturday, December 08, 2012

21

They say that peering lightyears on lightyears out into space is like looking back in time.  Look far enough, and you can catch the very first moments of the universe.  SharePoint is also a universe of sorts.  It's certainly vast and complex enough, and random enough, too.  Its history is written in a maze of ever more obscure backward compatibility features, and the daring may peer into the gaping darkness.  Perhaps even reach in... and grope nifty things like filtering list views with URL parameters.

This technique isn't used much in SP 2010, but still works for backward compatibility.  You can sort and filter list views by tacking on some URL query string parameters.  It also works on any page with a ListView Webpart.

This post will cover:
  • Basic URL filters
  • Filtering multiple columns
  • Multiple filter values on a single column
  • Wildcard filters
  • Filtering on lookup columns

Basic Filter

For instance, the query string below filters the Orders list view to show only items where Product is equal to Jetpack:


You must refer to columns by their internal name, which may be different from the display name.  Fields with spaces in their display name will certainly have different internal names.  For instance, the internal name for Order Number would likely be Order_x0020_Number.

Filtering Multiple Columns

Filters on additional columns can be appended with

&FilterField2=_____&FilterValue2=_____

And so on.

Multi-value Filters

To apply multiple filter values to a single column, the syntax is a little different:

&FilterName=______&FilterMultiValue=____;____;_____

Separate each filter value with a semi-colon ( ; ).  For instance, show only orders whose Product is Jetpack OR Prismatic Core:


Wildcard Filters

FilterMultiValue also supports partial matches.  Use the asterisk ( * ) symbol to indicate a wild card. For instance,

&FilterName=Product&FilterMultiValue=*jet*

shows all orders whose Product contains the string "jet":

Lookup Column Filters

In the examples above, Product is acutally a lookup field, and I've been filtering using the lookup value.  If the Product names are very long, or we just don't know the names, we'll have to filter by the lookup ID.  That is requires a little tinkering with the list.

First we have to bring the lookup ID over as a projected field.  Go to List Settings and edit the lookup column (Product in this example).  Under Additional Column Settings, make sure the ID field is being brought over.


This adds a field to the list called Product:ID, which we can now use to filter the list views.  Because the display name contains a colon ( : ), the internal name will be different.  In most cases, it will be Product_x003a_ID.

The following filter shows all items whose Product's ID is 4:


Joins and Projections in SharePoint 2010

Friday, December 07, 2012

6

List joins and projections is a new feature in SP 2010 that seems to be seeing very little light of day.  Not surprising, considering it comes with a boatload of limitations and caveats.  But there are some situations where it can come in handy.  In this post I'll go over what they can't do, where they're useful, and how to do some simple joins.

Joins in SharePoint work much like SQL joins.  You have multiple lists that are related, and need to show the data in a combined view.  When there are only two lists, the normal lookup functionality usually suffices.  More than two is where joins come in.  However...

Limitations

  • There is no way to leverage joins and projections in a view through the UI.  CAML must be written.  Few things are more badass than CAMLs, but they're often hairy.  (Get it...? Maaan I crack myself up)
  • Joins can only be defined on lookup columns
  • Projected fields cannot be used to sort or group in the view
  • Dynamic sorting and filtering in listview webparts is also not supported
  • Projected columns do not show up correctly in datasheet view, or when exported to Excel

Use Case

Joins and projections can be very useful for filtering and displaying in a listview data from multiple related lists.  Consider this example where we have three lists with a grandparent-parent-child relationship: Manufacturers, Products, and Orders.  Each is linked to the previous by a lookup column.


Since Orders has a lookup to Products, we can create a list view of orders with their related products.  OOB lookup column functionality in SP 2010 allows us to pull in other Product fields as well, such as SKU.


But, what if we want to include the Manufacturer and Industry?  In the rest of this post I'll go over exactly how to achieve something like this:


Unfortunately, a lookup column cannot be used to pull in another lookup field.  Product:SKU works because SKU is a text field on Products.  Product:Manufacturer isn't supported since Manufacturer is a lookup field.

We could create text fields on Products and use event receivers to populate them whenever Manufacturers/Products are updated.  But that's clunky, especially if we need to capture other Manufacturers fields such as Industry.

Joins and projections offer a more elegant solution.

Join Example

The markup below joins Orders to Products, then Products to Manufacturers:

<Joins>
    <Join Type="LEFT" ListAlias="prd">
        <Eq>
              <FieldRef Name="Product" RefType="Id" />
              <FieldRef List="prd" Name="ID" />
        </Eq>
    </Join>
    <Join Type="LEFT" ListAlias="mftr">
        <Eq>
              <FieldRef List="prd" Name="Manufacturer" RefType="Id" />
              <FieldRef List="mftr" Name="ID" />
        </Eq>
    </Join >
</Joins>

Note that the actual lists involved are not explicitly specified.  Since we'll be creating our view on the Orders list, that is assumed to be the root for the joins.  The join from Orders to Products does not specify Products either.  That is implicitly determined by the fact that we're joining on the Product lookup field.

Each joined list has to be assigned a List Alias, which is how it will be referred to later.

The two <FieldRef> elements in the join condition specify the pair of fields that are being joined:

  • The first refers to the Internal Name of a Lookup column (Product) on the primary list (Orders). In the first join, the primary list is not specified; it is assumed to be the root list (Orders). In the second (and any subsequent joins), the primary list must be specified by it's List Alias (prd). RefType should always be "Id".
  • The second FieldRef specifies the column being joined to. It always refers to the ID column of the target list, specified by it's List Alias.

Projection Example

The markup below creates two projected fields from the joined Manufacturers list:

<ProjectedFields>
    <Field Name="Manufacturer" Type="Lookup" List="mftr" ShowField="Title" />
    <Field Name="ManufacturerIndustry" Type="Lookup" List="mftr" ShowField="Industry" />
</ProjectedFields>

Projected fields must  be type Lookup.  The List attribute refers to the List Alias of a join defined above.  ShowField refers to the field on the joined list to create the projected field from.

Putting it Together

When creating a new list via CAML, the joins and projected fields XML above can be included in the list views definition.  Note that they are not children of the <Query> node, but completely separate elements.

Adding a view to an existing list, however, can only be done using the object model.  The easiest way is to make a new feature and put the view creation code in the feature receiver.

Important: Do not include the root <Joins> and <ProjectedFields> tags when setting SPView.Joins and SPView.ProjectedFields.  That will cause a view compilation error at deployment time.

The SPList.Views.Add(...) method does not have parameters for joins and projected fields markup.  Those are set after creating the view.  This means you also have to add view columns after the view is created, instead of passing them in.  See comments below.

public class JoinDemoEventReceiver : SPFeatureReceiver
{
public override void FeatureActivated(SPFeatureReceiverProperties properties)
{
SPSite site = properties.Feature.Parent as SPSite;

if (site != null)
{
SPList ordersList = site.RootWeb.Lists["Orders"];

// Fields to include in view. Leave this empty. We will add fields after
// creating the view. This is because projected vields are not available yet.
StringCollection fields = new StringCollection();

// View Query, Joins, and Projected Fields markup (from examples above)
string query = "<Where></Where>";
string joins = "<Join Type='LEFT' ListAlias='prd'><Eq><FieldRef Name= .....";
string projection = "<Field Name='Manufacturer' Type='Lookup' List= .....";

// Create new view on Orders list, and set the Joins and ProjectedFields
SPView view = ordersList.Views.Add("Joined Orders",fields,query,100,true,false);
view.Joins = joins;
view.ProjectedFields = projection;

// Add fields to view
view.ViewFields.Add("Title");
view.ViewFields.Add("Product");
view.ViewFields.Add("Product_x003a_SKU");
view.ViewFields.Add("Manufacturer");
view.ViewFields.Add("ManufacturerIndustry");
view.ViewFields.Add("Quantity");

// Save
view.Update();
ordersList.Update();
}
}
}

The Finished Product

Build and deploy the solution, and activate the feature.  If all goes well, you should have a new list view with joined columns from its parent and grandparent lists.  Here's our "Joined Orders" view with related product and manufacturer!


If you modify the view from the UI, the projected fields can be shuffled around, or used to filter the view like normal fields.  However, you can not group or sort by them:

 
The end!


List Items in SharePoint Meeting Workspaces

Sunday, April 22, 2012

3

Lists in SharePoint Meeting Workspaces with multiple instances (a recurring meeting, or multiple single meetings) can be in one of two modes:

  • List items are shared across all meeting instances
  • List items are specific to a meeting instance

Most of the OOB lists in a Meeting Workspace are by default in the 2nd mode.  If you add a Task item to one meeting instance, it will not show up when you navigate to another instance.  This gives the user experience of each meeting instance having its own list, but there's really just one list that's "instance-aware".


Making a List Shared

To make a list shared from the UI, go to List Settings --> Advanced Settings, and select Yes for Share List Items Across All Meetings:


To do the same programmatically, set SPList.MultipleDataList to FALSE.

Retrieving Instance-specific List Items

To retrieve items from a specific meeting instance, set the SPQuery.MeetingInstanceId property when querying the list.  For recurring meetings, the InstanceID is an integer that represents the meeting date in yyyyMMdd format (ie. 20120422 for April 22nd, 2012).  In workspaces with multiple non-recurring meetings, the InstanceID is just an identifier like 1, 2, 3, etc..

The example below queries for all Tasks with the title "My Task" under the 20120422 meeting instance:

SPList taskList = SPContext.Current.Web.Lists["Tasks"];

SPQuery query = new SPQuery();

query.MeetingInstanceId = 20120422;
query.Query = "<Where><Eq><FieldRef Name=\"Title\" /><Value Type=\"Text\">My Task</Value></Eq></Where>";

SPListItemCollection results = taskList.GetItems(query);

To retrieve items across all instances from a non-shared list, set SPQuery.MeetingInstanceId to the SPMeeting.SpecialInstance.AllButSeries enumeration.  You have to cast the enum to an int.

Adding Instance-specific List Items

To add a list item to a specific meeting instance, simply set the item's InstanceID.  Property name is case sensitive, and value must be of type int, not string:

SPList taskList = SPContext.Current.Web.Lists["Tasks"];

SPListItem newItem = taskList.Items.Add();
newItem["Title"] = "My Task";
newItem["InstanceID"] = 20120422;

newItem.Update(); 

For more tips such as how to find current or future recurring meeting instance IDs, check out my Working with SharePoint Recurring Meeting Workspaces post.